A whole lot has changed over the years when it comes to capturing those precious moments on snow. The kid’s first “pizza” run; dad’s mogul dash and capturing the view from the chairlift and gondola. We shot those pictures with traditional cameras. They did get smaller and easier to keep in our parkas, but it was before smartphones got really smart.
Today, many skiers and riders still rely on those cameras while a new generation doesn’t know an f-stop from a parallel turn. So, just for you, camera-addicts, here’s our two-part guide to ski photography.

Ski photography guide for using traditional cameras
Shooting on snow is hard. The challenges are many — physical, creative, mental and technical — and let’s face it, carrying a camera pack around sucks.
Professional lensman Liam Doran takes a bit of the mystery out of what goes into making great on-snow photos.
So whether you just want a few great photos from your first heli trip with the boys or you’re a seasoned amateur looking to make the jump, this series will offer a few tips to improve your game. And pretty soon, you’ll be swapping lenses and producing photos with white snow.
After years of shooting ski photography, I’ve learned to plan exhaustively and communicate constantly with my subjects. Good planning and communication give me the best chance to get the photos I want and are the topics of this piece.
1. Know the Weather
Pay attention to the weather forecast, scope the mountain all day while you’re riding and plan your day accordingly. I sometimes use hourly forecasts to get a feeling for when a storm might roll in or break up, and I use the forecast to plan where I shoot on the mountain and when.
While skiing, I’m always scoping which zones on the mountain will get the afternoon alpenglow and which will be buried in shadow. So if the weather cooperates, at last chair I’ll be standing atop a bowl of untouched powder with magical afternoon light and the clouds just breaking up above me.
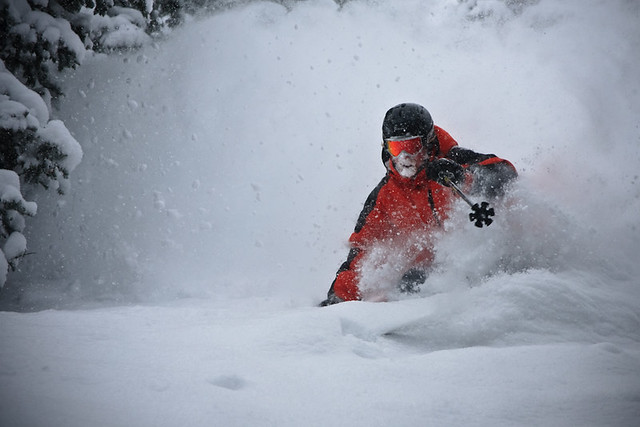
Extra Tip: Shooting during a storm can be rewarding, but it can also damage your gear. Be sure to bring extra goggles, gloves and a chamois to keep your camera and lenses dry.
2. If Skiing With a Guide, Ask Questions
If you’re planning to ski with a guide or group, call beforehand to find out if there’s a prime time for photography. It’s not uncommon for a guide to help you get in the perfect spot for a photograph, and experienced guides know the photography game well. If your guide knows your goals at the start of the day, he or she can plan the day accordingly.
3. Create a Plan
If you’re skiing with friends or family, it doesn’t hurt to create a plan of action. For a pro that might mean coordinating with athletes and drawing locations on trail maps, but for most it entails taking a few minutes to talk about what you want to shoot and what they should be ready for. Impromptu photos are great, but if you’re hoping to get the perfect powder shot, timing, location and patience all play a key role. So take five and get on the same page with everyone.
Pay attention to the weather forecast, scope the mountain all day while you’re riding and plan your day accordingly.
4. Prep Your Gear
If you plan to carry multiple lenses in that 50-pound pack, take time to clean them the night before. Always check batteries and clear memory cards before a day in the snow. It’s easy to run out of battery life or memory, and you don’t want to miss any of the action. The morning of a shoot, I typically go through all my gear once again just to make sure I’m ready.
5. Scout The Run
If you’re on a heli or cat trip, it might not be possible to take the same line twice, but if you’re shooting in-bounds take a run first and look for areas you want to set up your shot. Then go back and shoot in the locations you marked out. The extra run will help you keep from wondering what’s just around the bend and what you might be missing by staying put.
6. Get Off Your Skis
You’re smart enough to get out of your car to take a picture of the scenery, right? So why are you twisted like a pretzel trying to take a ski photo? Take your skis off. You’ll be able to move around quickly, get different vantage points and keep yourself steady. It takes just a few extra seconds, but it’s worth it.
7. Have Fun and Be Nice
Remember to have fun when shooting and look for inspiration no matter how the day goes. It’s your job to keep your subjects stoked by telling them how much they rip and always be courteous to other skiers on the mountain.
Composition
Just like learning how to ski with a pack on, learning how to compose a photo is key to getting the right shot when you need it. While there are several tricks to setting up the perfect photograph, there are a few staple techniques that should never be overlooked. Just remember to practice these before hitting the slopes and before you know it they will become second nature.
1. Rule of Thirds
Used in nearly every shot I take, this is the technique of breaking apart the frame into thirds both vertically and horizontally and aligning the subject at the cross-sections. By moving the subject away from the center of the photograph, the viewer’s eye will travel naturally through the photograph towards the action. You’ll notice in the shot below that I kept the skier in the bottom right corner of the photograph leading the eye into the skier’s path.
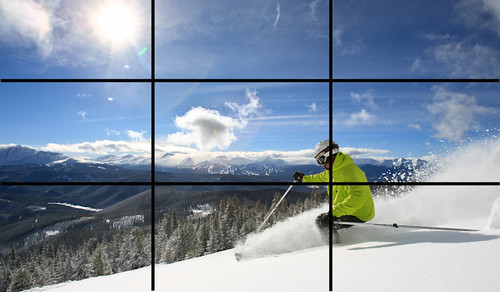
Breaking up the photo into thirds, draws the viewer’s eye towards the subject.
2. Leading Lines
This technique is used mostly by landscape photographers but translates well into ski and action photography. The goal is to select a line in your frame and allow the line to guide the viewer’s eye toward the subject. Some examples of lines may include shadows, trees, ridgelines or the horizon. The trick is to line up the subject at either the end or beginning of the leading line.
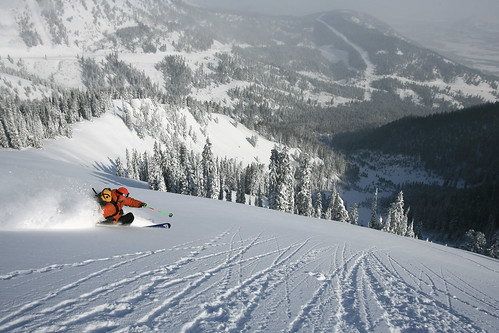
The leading lines draws you deeper into the slope, and shows how steep it is.
3. Positioning
A big mistake of both professional and amateur photographers is always keeping the camera at eye level. While it’s okay to take shots standing up, it’s also important to move things around. Take off your skis, crouch down and stand tall. The change in perspective will allow you to highlight various subjects in the frame and draw attention to the action you want to showcase while providing a unique angle.
4. Framing
Something I learned early on is to be ultra-critical of everything in the frame. The goal is to never have something that distracts or degrades the image, and takes away from the subject and overall mood. This can be difficult to achieve on snow, but taking a moment to look around can reduce easy-to-solve problems like chairlifts or signage.
Another trick is to make sure you leave enough room in the frame for your subject to move through. For instance, if your skier is moving left to right be sure not to have them at the extreme right side of the image with nowhere to go.

Here I used the trees to frame the skier and draw the viewer’s eyes toward the subject.
5. Horizon
An uneven horizon is disorienting to the viewer and a sure mark of an inexperienced shooter. It is always best to get your shot level in camera, but you can usually straighten it out afterwards in post-production. The problem with doing it in post is that you may lose part of the image due to cropping and thus your framing and rule of thirds may be off.
6. Big Air
If you’re shooting your buddies in the park or hucking themselves off cliffs, always be sure to include either where they are taking off from and/or where they will be landing, preferably both.
A shot of a skier hovering in mid-air with no point of reference to the ground (a.k.a. the “guy in the sky” shot) is disorienting and should be avoided.
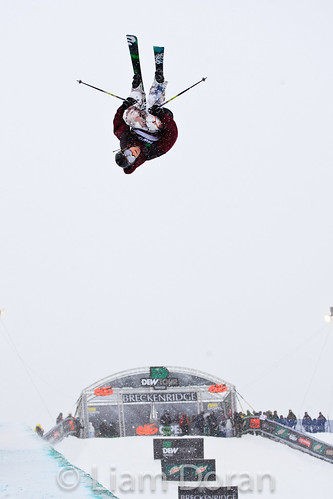
Here I have just a hint of the edge of the pipe, but that little bit makes a huge difference in communicating the story to the viewer.
7. Communication
Before shooting talk to your skier and let them know exactly where you want them to ski. This can be tricky, as the view from where you stand and where your skier stands is completely different, so make sure to tell them your goals. You can go high-tech and use radios, or sometimes the simplest solutions are the best. Throw a snowball on the spot where you want the subject to turn. It’s low-tech, but works quite well and is used by the best ski photogs in the biz.
Of course, there is a time and place to break all of these rules, but it’s best to master them first. As always don’t be afraid to experiment and try new things. That is usually when things go right and you’ll get a picture you weren’t expecting.


